N-body Simulations in Blender
Visualising particle data in Blender is a good deal simpler than volumetric FITS files, but since I don't work with this sort of data set regularly, I've not developed these tools to the same degree. The old version of FRELLED comes with a built-in n-body viewer, but this proved a step too far for the Great Recoding Effort of 2020-2023. This is going to have to wait for the next major upgrade. Still, on this page I want to record some insights into how best to display n-bodies in Blender.
No need for actual particles
I'm sure you can import into Blender's own particle data format directly, but exactly how this can be done I don't know. It's much easier just to import a mesh and use the vertices as the n-bodies, giving each a halo material. Do not, if you can possible avoid it, try and import each particle as a separate object, unless the numbers are very small (< 1,000). Blender gets mighty cranky if it has more than a few thousand objects in the scene. You can do it, but instead of taking seconds to import it'll take tens of minutes, and the file size explodes. Even going above a mere thousand objects results in a substantial slowdown.
There are two viable and much better techniques to importing n-bodies as mesh vertices. The first is to import the data in each frame (timestep) of the animation as a separate mesh, storing all the meshes except that of the current frame on a non-visible layer. Alternatively you can animate the position of the meshes rather than their layers. Blender < 2.5 allowed you to animate layer visibility directly but later versions do not, so for that you can either animate position instead, or set up a script running in the background using a "frame_change" handler to continuously change the layers of each mesh based on the frame.
The advantage of this method is that you store all the data in the .blend file, and the playback in the real time view is near-instantaneous. It's also fast to import the data because you're only creating a small number of objects, likely only a few hundred depending on how many timesteps you have. Blender can handle this just fine and doesn't care nearly as much about the total number of vertices, which can quite comfortably number in the millions – and for most simulations, only a few tens of thousands will be visible at any one time. It also keeps the file size relatively small.
The second method is to create a single mesh containing all the vertices you'll need, animating their position every time the frame is changed. This keeps the file size very small indeed, but it does mean that the real time view updates much more slowly. If you're looking to examine the simulation behaviour over time (that is, if watching motion is more important to you than examining the shape of the data), this method might not be suitable for you because the lag can be considerable, seconds per frame. However, since it greatly reduces the number of vertices and objects in the file, it can be far better for examining larger data sets.
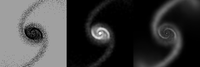
The third method is the one you should avoid unless all else fails : import each particle as a separate, animated object. This is slow and makes the file size massive. Seriously, it's not good. But it does mean you can interpolate particle position over time, so if your particle number is very small and your timesteps have large gaps between them, you might just get away with it. Another advantage is that it's easy with this technique to represent each particle as a different rendered object. Here's the same galaxy cluster simulation but showing each galaxy as a sphere, with the diameters scaled according to the mass (to my annoyance, I've misplaced a prettier version where each galaxy was shown using a galaxy image) :
Pretty particles
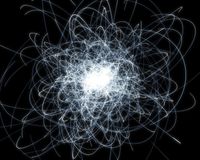
Making the particles look nice in the real time view is tough. For Blender < 2.5 this is all but impossible, since it didn't even let you have different coloured individual (isolated) vertices. The only way I could contrive was to set different colours for the wireframe, selected and active objects. At least this way you could have a few different colours for different components (e.g. gas, stars, and dark matter), but this is very hacky. Fortunately later versions of Blender give particles the same colour as the mesh's material, so you could set up a particle system with the same number of vertices (starting and ending on the same frame, emitted only at the vertices with no randomisation, and with a lifetime of only one frame)... et voila, you've got particle vertices of different colours and even sizes.
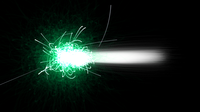
Of course in the rendered view things get a lot easier. Here ordinary halo materials suffice just fine. If you're using an SPH simulation, I highly recommend setting the halo size based on the kernel size. This gives you a nice adaptive resolution that gives you big, diffuse gas in the low-density regions and tight, well-defined structures in the denser regions.